How to do Surya Namaskar
By Himanshu JoshiYogahow to do surya namaskar, surya namaskar“What is this life is full of care, We have no time to stand and stare….”
In today’s fast paced life, where people are indeed too pre-occupied by work, responsibilities and the consequential stress and pressures on a day-to-day basis, there has arisen the increasing need for stress-busters and a healthy lifestyle to balance the mind and body, Thus, in the recent years, yoga has been seen as a popular form of exercise that not only is just physical but spiritual and mental as well, as along with the asanas or poses, yoga also teaches the practitioners about breath control and self-discovery.
With a history aged 5000 years, yoga is an art that entails the practice of the mind and body. The ancient philosophy of yoga finds its roots in the land of saints and spirituals – India. The art is a beautiful combination of meditation and relaxation, breathing techniques and physical postures.
Different types of yoga
With a rich ancient history and philosophy, yoga is of several kinds and disciplines such as hatha yoga , ashtanga yoga, kundalini yoga and more.
Asanas (postures)
You might have come across it in some movies or real life, where a practitioner is in a particular position and standing or seated while at the same time twisting and balancing his body postures. An asana can be said to be a form of exercise in the modern yogic field that entails any position or pose be it standing, reclining, or in an inverted one and the balancing of the different poses. It has been defined in the yoga sutras of Patanjali. Originally a Sanskrit term , the alternative term for asanas in English is ‘yoga postures’ or ‘poses’. Some of the popular asanas include: balasana (child’s pose), tadasana (mountain pose), setuasana (brige pose), shavasana (corpse pose), and many more of which one of the most popular is ‘surya namaskar’ or ‘sun salutation.’
What is Surya Namaskar?
Sun- the almighty source of life on the planet, we of course cannot just imagine life without the sun! It is indeed one of those blessings that has made the survival of living beings possible on earth ! To express gratitude and respect to this powerful element of the universe, may cultures have been worshipping the sun since time immemorial, such as the Egyptian, Hindu, Buddhist and many other such cultures. Another ancient technique followed to pay homage to the sun is the Surya Namaskar or ‘Sun Salutation’ .
History of Surya Namaskar
With an interesting history as narrated by the ancient rishis or sages of India, it is said that it is the divine light or divine impulses that govern the different aspects of our body. These are the devas. Lying behind the central point i.e the navel, in the human body is the solar plexus. This is also called the second brain and is referred by its connection with the sun. And this is why the rishis recommend Surya Namaskar as a practice to be performed regularly which in turn is said to boost the individual’s creativity and perceptive powers through the augmentation of the solar plexus.
How did surya namaskar originate?
It has been told that sun salutation was first introduced by the King of Audh in The region of Maharashtra, India. During his reign, he actually emphasised upon the maintenence of this sequence without fail and its regular performance. Whether there maybe any element of truth in the story or not, it can be said that this tradition began in that zone of India and today the surya namaskar is a widely accepted way of exercise that sets a divine beginning to each day for the yogis and practitioners. In fact it is in India where yoga is taught as a subject itself in many schools where the daily routine starts with the sun salutation as a form of exercise.
Surya Namaskar when translated literally means “salutation to the sun.” The term however carries a deeper meaning when carefully scrutinised.
When the two words of ‘Surya’ and ‘Namaskar’ are broken up, we get a clearer meaning as follows;
“Namaskar” – this indicates the bowing of the head as a sign of gratitude and the offering of oneself to the other wholeheartedly in an unbiased and impartial manner.
“Surya” – the force that illuminates the entire realm.
So in the performance of the asana of Surya Namaskar, the practitioner bows in due respect and a complete gratitude towards the supreme force that in reality illuminates the entire world.
Do’s and Don’ts of Surya Namaskar
Make sure to follow the instructions of your yoga guide or instructor. In addition, here are some important tips for you to bear in mind while performing Surya Namaskar.
Do :
-maintain the right body postures
-follow the proper breathing which should be rhythmic
– follow the sequence of steps
– -Gradually augment the amount of repetitions
-Pursue a healthy diet (vegetarian meals if possible)
-Pursue your training on a regular basis
-Be aware as you perform each pose
-Dress comfortably
-Keep yourself hydrated
-Begin these poses at a slow rate
Don’t:
– Start off in any random order
– Hurry up as to the amount of repetitions
that you can perform
How To Do Surya Namaskar: The 12 Poses
Step 1- ( Prayer Pose)
This pose is performed while standing on the edge of the yoga mat and keeping the feet together to be able to balance the weight on the feet both sides equally. Now the chest is to be expanded while keeping the shoulders relaxed. As you inhale , then from the side,both arms are to be lifted up and on exhaling, the palms should be brought together towards the front part of chest as is in the praying position.
Step 2 -(Raised Arms pose)
As you breathe in, lift up your arms and then back while placing your biceps in proximity to the ears. This pose aims to give a good stretch to the entire body starting right from heels and then up to the finger tips.
Step 3- (Hand to Foot pose)
As you exhale, this pose is to be performed while bending forward from your waist and the spine should be kept erect. On complete exhaling, the hands are to be brought down to the ground, near to the feet.
Step 4 -(Equestrian pose)
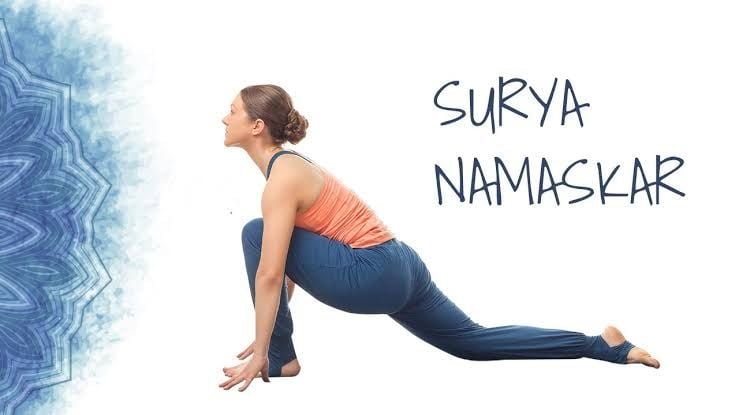
Breathe in and push back your right leg as far as you possibly can. Bring your right knee towards the ground. Now look up.
Step 5 -(Stick pose)
As you inhale,the left leg is to be taken back and the entire body to be brought in a straight line while the arms being kept at an angle of 90 degree to the ground.
Step 6 -(Saluting with eight points or parts)
The knees should be brought down to the ground . Breathe out. The hips are to be taken back a bit. Slide ahead while resting the chin and the chest on the ground. The posterior should be raised slightly while both feet and hands , chin and chest and both the knees should be touching the ground.
Step 7- (Cobra pose)
The chest is raised up as you slide forward into cobra pose. In this pose, the elbows maybe kept bent while keeping the shoulders far apart from your ears. now take a look up. Breathe in while gently attempting to push forward the chest. While as you breathe out attempt gently to push down the navel. Keep your toes tucked under. In this pose, your elbows can be kept bent. Make sure that you can stretch as far as possible within your capacity without forcing yourself to do so.
Step 8- (Mountain pose)
While exhaling, your hips and tailbone are to be raised up and the chest faced downwards into posture of, an ‘inverted V’ (/\). Attempt keeping your heels onto the floor while gently trying to lift up the tailbone and deepening the stretch.
Step 9- (Equestrian pose)
While inhaling,the right foot needs to be brought forward in the middle of both your hands,bring down the left knee on to the ground,with the hips pressed down,look above. Keep the right foot placed in the centre of both your hands. Keep your right calf facing perpendicular to the ground. You can make your stretch deeper by gently attempting to push down your hips to the ground in order to keep the stretch deepened.
Step 10- (Hand to foot pose)
As you exhale, bring forward your left foot while placing your palms onto the ground. Bend your knees if required. Now straighten up gently your knees. If possible, make an effort to reach the nose upto your knees. Continue the breathing.
Step 11- (Raised Arms pose)
As you inhale, the spine should be rolled up. Raise up hands and do a little bit of backward bend as you push the hips in a direction slightly outward. Do make sure that the biceps are in the proximity to your ears.
Step- 12
While breathing in, keep your body straight. Now bring down your arms. Relax and watch for sensations within the physical body.
Health Benefits of Surya Namaskar
-Keeps your muscles toned and flexible.
The various asanas under Surya Namaskar emphasize upon the various muscle groups and on the Chakras or nerve centers. This essentially aids in the toning of mostly all the parts of the body which includes arms, thighs, and abs and the butts as well. It adds greater flexibility to the body while improving the posture of the body.
-Immense cardio training and brings about hormonal balance
Get a thorough workout for your entire body with Surya Namaskar. When performed at a rapid pace, it works well in the form of a cardio workout and also improves the blood circulation which in turn lowers the cholesterol levels and also improves the health of the heart. Proper blood circulation helps maintain proper hormonal balance.
-Aids in improved digestion and encourages weight loss
A balanced diet coupled with adequate exercise and proper rest, improves sensitivity of insulin. Surya Namaskar works by stimulating the digestive tract through the production of digestive juices of the right type. Thus, the metabolism is improved which aids in the elimination of toxins and burning up of the added calories.
-Increases energy and awareness levels
The surya namaskar entails essential breathing patterns which calm the mind and relax the body. It enhances self-awareness which in turn boost the individual’s energy levels.
-Improves Your Skin’s Glow
Sun salutation and a glowing skin? Yes, it is what you can get because of the enhanced blood circulation, proper digestion, increased levels of relaxation and getting adequate sleep due to performing regular sun salutations.
Can Surya Namaskar be learnt by self without attending any classes?
Although in this era of internet, there are innumerable videos and written instructions that are accessible easily, it is best to learn the asanas such as Surya Namaskar in the presence and under the guidance of an experienced instructor in order to be able to perform the posture with perfection. You may even have access to online classes, however these are unmatched when compared to live classes as you will be able to attain more personalised attention. To learn Surya Namaskar in the detailed way and to perfect this asana, a yoga teacher training course is the best idea as you will be able to learn the same from scratch and India is the place to be, as this is the land where yoga originated, so the authentic form of yoga is best accessed in this land of saints and yogis. There are many yoga schools in India conducting courses on yoga teacher training that can also help build your career in the teaching field of yoga. Thus, you can deepen your knowledge and practice of yoga through a yoga teacher training program and at the same time gain a life-changing experience.